Thursday, December 5, 2013

Dining Room ReModel Part 1


When the previous owners of our house decided to put the house on the market, they went through and spray painted every room of the house the exact.same.color.  Oh my gosh, drove me crazy! Slowly but surely we have been painting rooms and last week we finally tackled our dining room! 

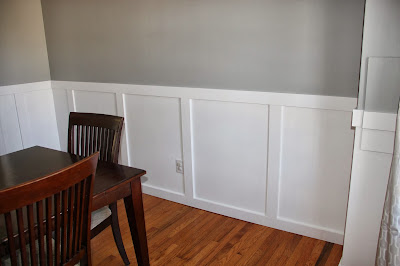
We have never had a dining room before so when we moved in we basically just threw a table in the room, put a couple random pictures on the wall and left it alone to wait for some attention at a later date.  But finally, last week we were ready to give that room some love!  I wanted to add a little something extra since this is technically a 'formal' dining room, so we decided to add a board and batten to the bottom of the walls.  We also added casing around the doorways, which we plan to do on the rest of the doorways in the house as well.   Here's what it looked like before...just try to contain your excitement on the effort that had gone into it...!


And this is what it looks like now:

 (that is my little Firefighter Christmas Tree...more on it later ;) )


We used  primed MDF boards and they were so easy to work with!  We did have to take into consideration our stairs, outlets, and laundry chute that is in the corner, so we were creative in some of those areas and did some careful planning on how to space out the verticals, but we are so happy with how it turned out!  This was a super cheap project and very easy (isn't that the best combination for a project to be?!).

Like I said, we did not have a dining room before we moved so I still need to get matching furniture, some things up on the walls and a new light fixture, but for now I am happy with how "Stage 1" turned out :)  Hopefully I will have an update with everything completed sooner rather than later ;)

-Emily

Wednesday, November 6, 2013

Pumpkin Chocolate Chip Cookies


Well, I got the baking-itch today after scrolling through FaceBook and seeing all of the wonderful creations that my friends are making for Thanksgiving tomorrow!  I am cooking dinner at my house and my mom is bringing desserts so I had no reason to do any baking, but the mood just really hit me so I set out on the best site ever (Pinterest of course!) to find an idea.  I came across these cookies and decided to give them a try.  Oh my goodness, YUM!  They were so fluffy, moist, and soft.  Perfection!  You can view the original recipe from Inside BruCrew Life here.  The only change I made was that I did not use walnuts. 
Here's what I did:

1 cup canned pumpkin
1/2 cup brown sugar
1/4 cup sugar
1/2 cup vegetable oil
1 egg
1 Tablespoon vanilla 
2 cups flour
2 teaspoons baking powder
2 teaspoons cinnamon
1 teaspoon nutmeg
1/2 teaspoon salt
1 teaspoon baking soda
2 cups chocolate chips

  1. Use a mixer to combine pumpkin, sugars, oil, egg, and vanilla and mix together. 
  2. In a separate bowl combine flour, baking powder, cinnamon, nutmeg, salt, and baking soda.
  3. Slowly mix the flour mixture into the pumpkin mixture.  
  4. Stir in chocolate chips
  5. Bake at 350°F for 9-10 minutes. 
Note: I used my convection oven which automatically brings the temperature down 25° from what you set it at, so mine cooked at 325°F 

I wish all of you a  very Happy Thanksgiving!!
-Emily

Friday, November 1, 2013

Controlling Paper Clutter


The amount of paper that comes into this house is just ridiculous!  I feel like I am constantly up to my eye balls in paper.  And that's with only 3 of the 4 kids in school so far!  I have tried so many different ways to deal with paper, but it seems to just constantly take over our lives. 

A while back I shared our Command Center with you that you can find here.  As I stated then, we have only been in our house for about a year and a half so I am still learning how to best function out of it.  We have a main floor office so I struggled with what to keep in there and what to have in our Command Center.  While I think I finally have that figured out, there is still the issue of paper piling up in the filer in the kitchen just because of the sheer number of papers that actually come through the door. 


With my husband working long hours, I try to keep mail and any school papers from the days he was gone in that area so he can look through it when he gets home.  But it is also where I put book orders, field trip forms that are awaiting signatures or money to go along with them, church take home sheets for the kids to fill out during the week, etc.  It fills up so quickly.  I can go through it all and have it cleaned out but as soon as the kids get home from school it fills right back up again.  Not working. 

So I decided I needed to get a file for each kiddo (well for the older 3...my 2 year old doesn't contribute to this problem...yet...).  This is for the sole purpose of keeping their book orders, church sheets, and school forms.  It will also serve as a place for them to put their papers for me when they get home from school.  As it stands right now, they all get home and start throwing papers at me.  I stack it all up and attempt to go through it, but sometimes I can't get to it right away...and then you have situations like not knowing which teacher sent home the pre-conference questionnaire to fill out...luckily I figured that out before sending it for the wrong kid and looking like a total flake of a mom! 

This is what my shelves look like now.  I've moved my little mesh sorter up higher (out of reach of kiddos of course :) ) and it is going to be used only for the things my husband needs to take a look at.  I bought this wall filer today and am anxiously awaiting hub's arrival home from the firehouse so I can have him put it up for me (he has a strict rule that I am not allowed to touch his power tools; or any of his tools for that matter.  Which is actually just fine with me because it just means I get out of some of the work-ha!).  I am actually hoping we can add strong enough magnets to the back so I can add it to the wall below my calendar. 


What do you do for paper?  Do you have any great products for keeping your paper under control?  Or am I the only one who seems to have mounds of it coming home everyday?!  I am cautiously optimistic that this new system may solve some of our problems, but would be happy to listen to any suggestions :)

Wednesday, October 9, 2013

Butter Baked Chicken


Here's another super easy dinner idea for you! 


1 Tbsp Garlic Powder
2 Tbsp Lemon Juice
2 Sticks of Butter
3-5 Chicken Breasts (cut in half long ways to shorten cooking time)

Melt the butter in a sauce pan on the stove, and add the lemon juice and garlic powder.  Stir so it is well  mixed.  Dip each chicken breast in the mixture and then place it in a 9x13 baking dish.  When all the chicken is in the dish drizzle with the remaining sauce.  Bake uncovered at 400°F for about 30 minutes. 

Note:  You can switch out the chicken breasts for legs, thighs, etc to mix things up.  Just watch your cooking times as they may differ.  

ENJOY!

Saturday, October 5, 2013

Roasted Green Beans


Here's an easy side dish with lots of flavor!  No need to measure anything either!  Here's how to put it together:


Put 1 can of Green Beans (or fresh if you have them!) in a square baking dish.  Cut up some Onion to go on top-depending on how much you like onions, choose how much you want to use.  Sprinkle some Minced Garlic on top and then drizzle with Olive Oil and Red Wine Vinegar until there is a thin layer on the bottom of the dish.  Pop it in the oven, uncovered, for about 10 minutes at 450°F. 

Enjoy!

Tuesday, October 1, 2013

Crock Pot Lemon Pepper Chicken


Well, after a few strange dinner planning flops that have happened this week, I was determined to get today's dinner started early so we didn't run into any issues at the last minute that would cause us to order out in a panic (again).  I have made whole chickens in the crock pot before and love them, but today I only had chicken breasts on hand, so I thought I would give my Lemon Pepper Chicken recipe a try with them instead!  I had to adjust a few things, and really watch the cook time, but they turned out great! 

Here's what I used:

-3 lbs Chicken Breasts (this was about 4 breasts)
-16oz Chicken Stock
-1 Tbsp Lemon Juice (I didn't have any fresh lemons on hand so I just used juice; in the future I would add fresh lemon slices instead)
-1 Tbsp Lemon Pepper Seasoning
-1/4 TbspGarlic Powder


I put the stock and lemon juice in the pot, added the chicken, then sprinkled the seasoning and garlic powder on top.  Cook on low for 2-3 hours. 

Note: If you have never used Crock Pot Liners you need to go out and get some TODAY!  Best thing ever!

Hope you enjoy this quick and easy dinner idea! 

Sunday, September 15, 2013

Easy Chicken and Biscuits


This is one of our all time favorites around here, and it is so simple to throw to together-yay!  Hope you like it!


2 cans (10 3/4 oz) Cream of Chicken Soup
1 cup of milk
1 Tbsp garlic powder (although we use a little more because we are garlic lovers!)
2-3 cups cubed cooked chicken
Can(s) of your choice of vegetable (or a combination): corn, green beans, peas, carrots
1 can of refrigerated biscuits-each cut into small pieces

1. Preheat oven to 400°F. 
2. Stir the soup, milk, and garlic powder together in a 9x13 baking dish. 
3. Mix in chicken and vegetables. 
4. Bake for 15 minutes or until the soup mixture is bubbling at the sides of the dish. 
5. Pull out and arrange the biscuit pieces on top and place back in oven.
6. Back for another 10 minutes or until biscuits are golden brown on top. 

*Note: If you have picky eaters, you can leave the vegetables out and serve them on the side.

ENJOY!

Sunday, September 1, 2013

Crock Pot Taco Soup


1 can of tomato sauce
1 can kidney beans-drained and rinsed
1 can of corn-drained
1lb ground beef
1 package taco seasoning
Tortilla chips (optional)
Sour Cream (optional)
Shredded Cheese (optional)

Cook the ground beef according to the directions for making tacos on your package of taco seasoning.  Add tomato sauce, kidney beans, corn, and cooked ground beef with taco seasoning into a large crock pot.  Let it cook on low for 3-6 hours.  Serve with tortilla chips, sour cream, and cheese and allow everyone to customize their own bowl!  

I love to use the chips to scoop up the soup, but some of my family prefer to crumble them on top and use a spoon-each person can make it their own way!  Perfect for a cool Fall evening!

*Note: this is easily doubled to feed more people.  I double this and cook it in my 6qt. crock pot with no problem.

*Tip: If you are in a hurry to get this put together before you head out to work in the morning, cook the beef and taco seasoning up the night before and keep it in the fridge overnight.  Then just toss it all in the crock pot in the morning!

ENJOY!